What's next?
Obviously I can't paint "41 Sniper" until after glassing her, so I'll begin this section on Painting the SBD with the steps I took to glass the plane. Then, I'll also include any ancillary scale details (exterior) in this section, such as panel lines, rivets, light fixtures, bombs, tailhooks, access hatches, etc.
Actually, the painting steps won't take place until after I've got pretty much everything done (except the interior). I would rather get all my bells and whistles built and mounted prior to painting, so that I can get better glue joints and can make any last minute surface modifications. I tried to get all interior mounting blocks taken care in the building section, so most details added now will be glued to the glassed surface without having to cut into the sheeting. Once the plane is completely detailed, painted, weathered and cleared, I will then move on to the cockpit/interior... that will be a nice little
winter project to finish things up with.
Determining a technique
I did a LOT of research on glassing techniques and materials only to find that this is an extremely controversial topic and there are a number of opinions out there on what works best. I weighed the bad and the good, considered my goals, and then decided to do some tests to determine what I felt was my best option. I have put together the results of my test here as a "Misc Data" article. Here's a link to the article...
Materials used for glassing
Here are most of the materials I used to glass my SBD and prepare the surface for painting...
 |
Sealing with Lacquer To avoid any warping issues with waterbased Polyurethane, I first apply 2 coats of Deft Lacquer Sanding Sealer to the balsa surface. This seals the wood from the moisture in the WB Poly, and makes for a smooth hard surface after sanding. Be sure to use a respirator with this or any other Lacquer based products... the fumes are very toxic. |
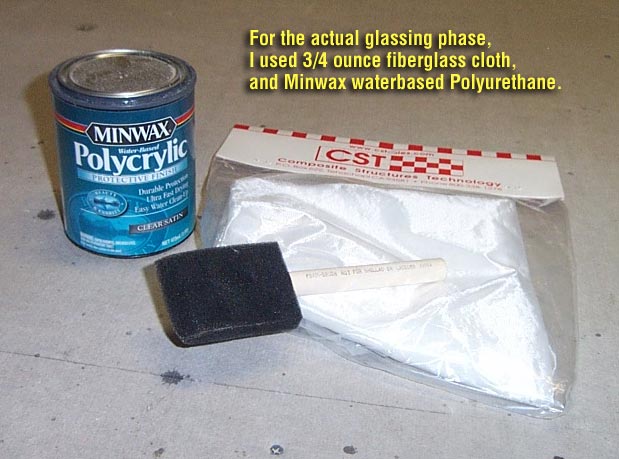 |
Glassing with Waterbased Poly I used Minwax Clear Waterbased Polyurethane (satin finish) to apply my 3/4 ounce fiberglass cloth. I used about 6 coats, as this stuff goes on very thin, and most of it evaporates. Sand lightly between coats to remove any bumps, strands, etc. and gradually build a smoother and smoother surface. It dries in about 15 minutes and is ready to sand in about an hour. It produces a very light and quite hard finish, goes on extremely easy, and now mixing or fumes. |
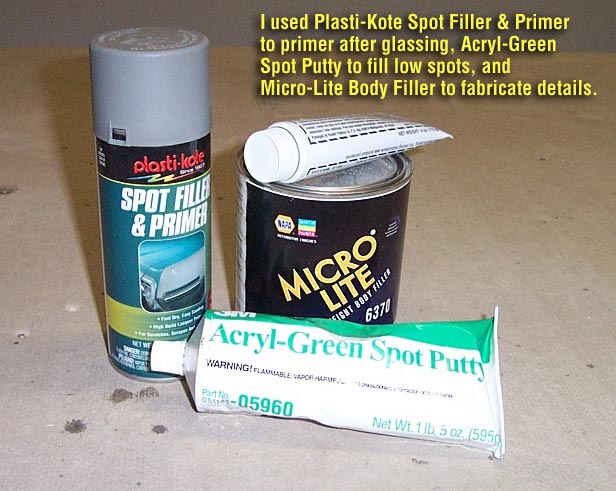 |
Primer and Putty I use Plasti-Kote Spot Filler & Primer to do my primering over the glass. It's a very high-build primer that does a great job of filling any remaining weave, small low spots, scratches, etc. After a good liberal application, I sand most of it back off, leaving the low spots clearly visible. To fill low or flat spots, I use Acryl-Green Automotive Spot Putty. It dries extremely fast and sands very easily. Watch the Toluene fumes on this stuff though. Also, I intend to use Micro-Lite Auto Body Putty to fabricate the small scale details. |
In my next update I will cover all my steps for glassing the wing and fuse...

"Glassing the Wing"