 |
 |
|
Prior to building this kit my experience has been limited to electric park flyers, a 40-size RTF trainer, and a SIG 4-Star 40 kit, so I'm no experienced master by any stretch. I am a graphic designer and have many years in scale model & diorama competition, but not in RC models. As for building glow powered kits, this Extra is only my second kit to date, my first being the SIG Four-Star 40. Most of the mods/tricks I explain in this site are due to a lot of good friends giving me a lot of tips and shared experience. Thanks guys! I asked around a lot down at the LCRC field when trying to find my next kit after the 4-Star and the Carl Goldberg Extra 300 was highly recommended to me by many. I was told that it was a great aerobatic plane but not as wild as the Edge 540, Giles, Caps, etc. making it a better choice for a new pilot like me. Bill Riley let me fly his one day down at the field and I was convinced that this was the right choice immediately. At the time, Carl Goldberg Models was being bought out and was no longer producing kits. So, finding one was our first challenge. My partner Dave was actually able to find two of these kits, one in a Lancaster hobby shop and the other on ebay. So he hooked me up and we both started building! My kit was a few years older than his and the die-cutting seemed to be a little sloppier. I ran into some serious issues a couple times trying to get things to line up that were as much as 1/8" off. This didn't make me very happy, but other than that the kit was a very easy build and subsequent flying to of this plane proved the overall design to be superb.
I used the stock wing mount gear/blind nuts supplied, but added one mod. I added a 3/32" light ply support plate on top of the wing so the bolts & washers get their pressure distributed over a larger area of the wing when bolted in. More strength and less pinpoint pressure on the wing. Motor Mount I used the stock supplied two-piece motor mounts with blind nuts into the firewall. I used bolts with nylon core nuts to affix the motor to the mount. The plane requires no down thrust but wants 2 degrees right thrust by shimming with three #6 washers. I used the stock supplied wooden spacer blocks to push the OS 91 out to the end of the cowl and shimmed it for right thrust with tapered hardwood instead of the 3 washer scenario. I felt this would give the motor mount more support and distribute the pressure more evenly than shimming in two corners with washers. Cowl/Pants/Landing Gear
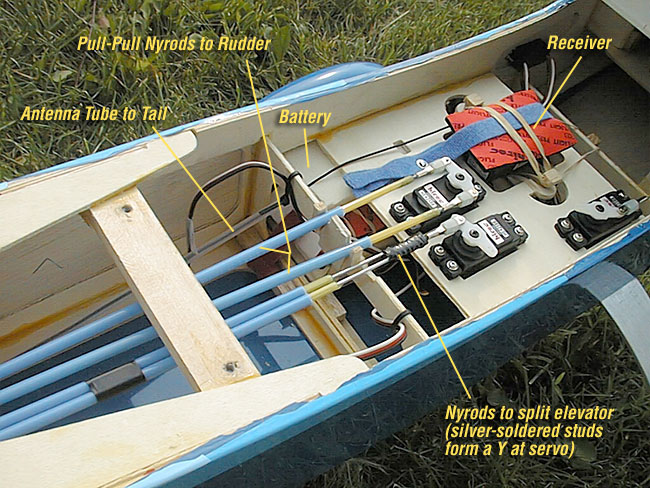
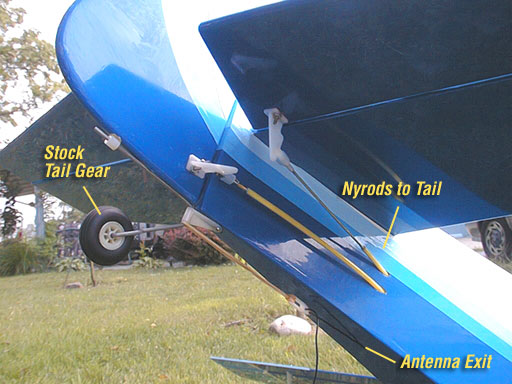
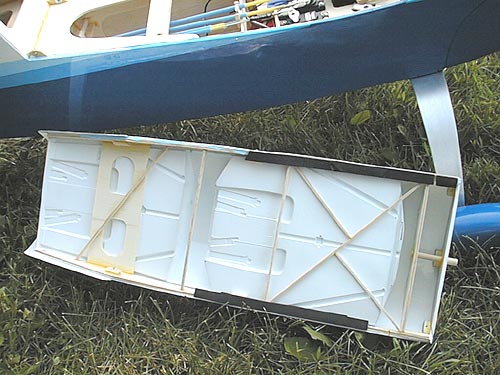
The tail gear is pretty adequate, so I set it up per stock plans/materials. One exception, I cut about 3/16" off the very bottom of the rudder after building it and epoxied in a 1/4" piece of hardwood and shaped it to match. This let me fine tune exactly where the bottom of the rudder lines up with the gear & fuse as well as giving me a good hard piece of wood to mount the tail gear wire to on the rudder. Sheeting The kit is built up ply & balsa throughout with about two thirds of the wing area being sheeted. The top & turtle-decks are sheeted with a high-quality 1/32" light ply sheeting. I opted to also sheet the sides of the entire fuselage with 1/32" balsa to make a better seam with the top decks. Control Linkage Bill Riley actually gave me some tips on a modified control linkage setup that he and a few others have had success with. The kit is designed to use either one aileron servo w/bellcrank or two servos, one in each wing. You most definitely want to use the dual servo option here! The rudder is designed for pull-pull cables, but I actually set mine up for pull-pull with nyrods. The plane uses a split elevator and asks for a single wood rod down the fuse with two control rods Y-ing off out of the tail to each elevator half. I used two nyrods again here and moved the "Y" up to the radio bay instead of the tail. In other words, I flipped the Y around the other direction by silver-soldering 3 threaded 256 studs together and attaching them to 2 nyrods that ran the full length of the fuse.
Antennae & Fuel Tank I also decided to run a plastic tube through my fuse and exited it out the belly just before the landing gear to keep my antennae inside. I did not follow the plan's direction to epoxy the fuel tank tray in, instead I made a couple blocks in the nose so I could screw mount the tray for easier removal of the Sullivan 12oz Slant Tank. Hinges Another controversial subject is hinges. On a plane this size I personally still feel safe with CA hinges, never had a problem with them. I used 4 per elevator instead of the planned 3 hinges. Someone once showed me how drilling a small 1/16" hole in the center of each hinge slot of the stabs, rudder and elevator let's the CA flow deeper back into the slot and better saturate the hinge and surrounding balsa... nice trick. I also used clear UltraCote to seal the hinge points of all control surfaces. Canopy/Cockpit
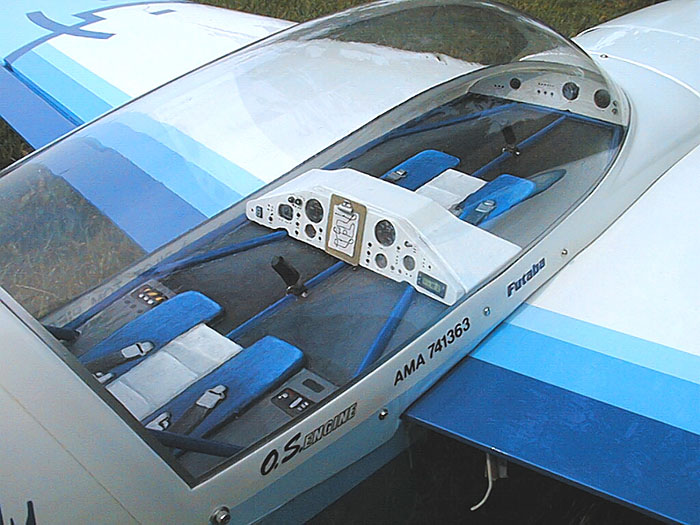
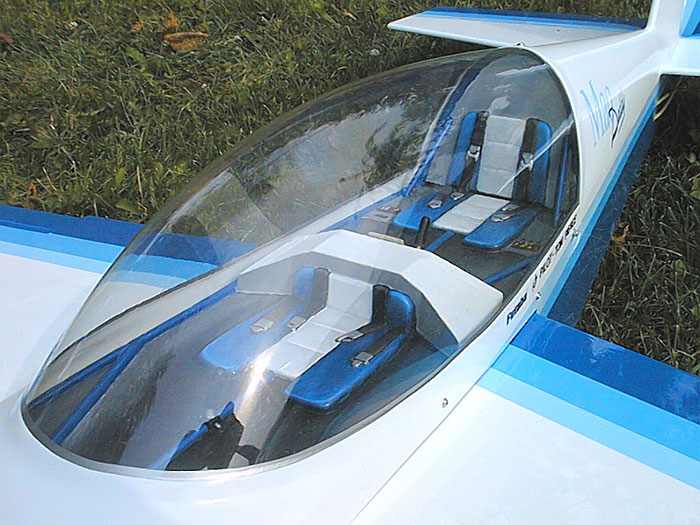
I glued small blocks on the underside as well in order to use small servo screws to mount the clear canopy bubble. This way I am able to remove it at any time to work inside the cockpit. By the way, I trashed my first canopy while painting the perimiter... I only masked the clear bubble on the outside and overspray got inside the canopy ruining it (DOH!). I was able to find an exact replacement canopy from TnT Landing Gear in Toledo, Ohio (about $21 if I remember).
I painted the 3D molded plastic cockpit floor with Testors Hobby Master enamels to get a high level of realism and matching color scheme to the plane exterior. I hand made the two dash boards (student/instructor) cutting my own gauges, switches etc. I also hand made a miniature wooden clip board complete with a laser printed pattern diagram and little silver "clip thingy." Lastly I hand carved the two joysticks and wrapped them with black heat-shrink tubing to get a realistic grip look. I used 4/40 blind nuts for the rear cockpit mounting screws and added an extra servo screw through the very top/back point down through the turtledeck into a small glued-in block. Feel free to e-mail me with any comments/questions you may have! |
 Kit Bio/Background - July 2002
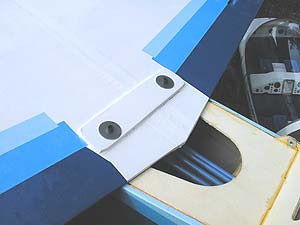 Wing Mounts