Let me start out by saying that I spent weeks reading newsgroups and web pages like this one on the internet trying to research my options for my first low-wing, aerobatic, tail-draggin' slimer before I chose to build this plane. If it were not for those that posted such material on the web, it would have been a much harder choice to make. This is why I decided to contribute back to the RC community on the web by creating this page.
I'll preface my story by letting you in on a little secret... this was my first glow-powered kit. I've "assembled" a few little electric parkflyers and an RTF, but that's it. So, I'm no expert at this stuff but feel that the 4-Star was a great tutorial in building piston-powered aircraft.
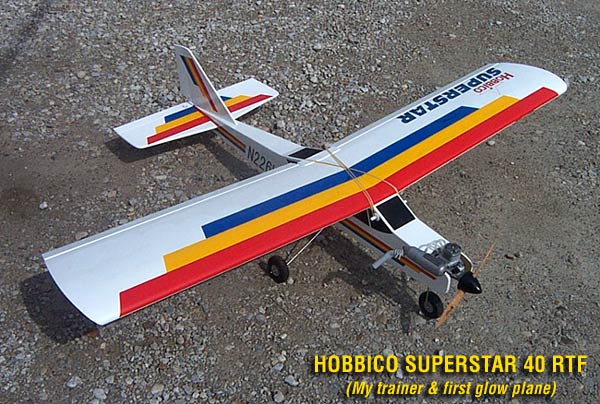
I've been flying the Hobbico SuperStar Select 40 trainer (RTF) for a couple months and decided I was ready to start building the 4-Star. I found that the 4* is a very popular plane for those wanting to get started in low-wing tail-draggers and were ready for a little more aerobatic performance than a trainer. Both the internet and my local flying club produced rave reviews of the plane's balance of stability and performance.
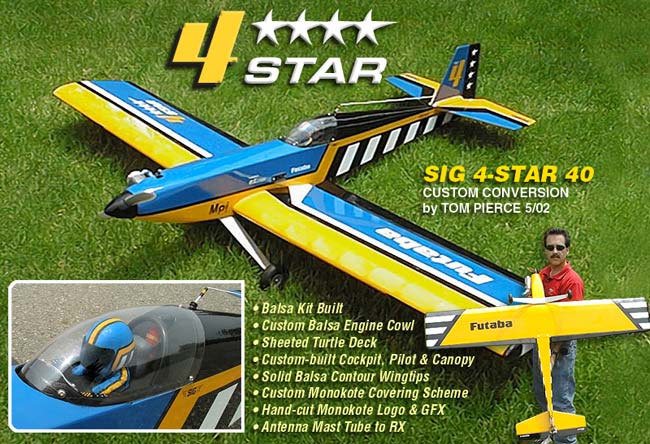
Therefore, I decided to go ahead and buy the kit and engine combo at Tower Hobbies and get started on my balsa adventure. As a graphic designer by trade, I decided to go ahead and add some structural modifications and graphic enhancements to the plane to give it some new lines and a unique appearance at the field The following information somewhat documents my modifications and my experience with building this fine kit
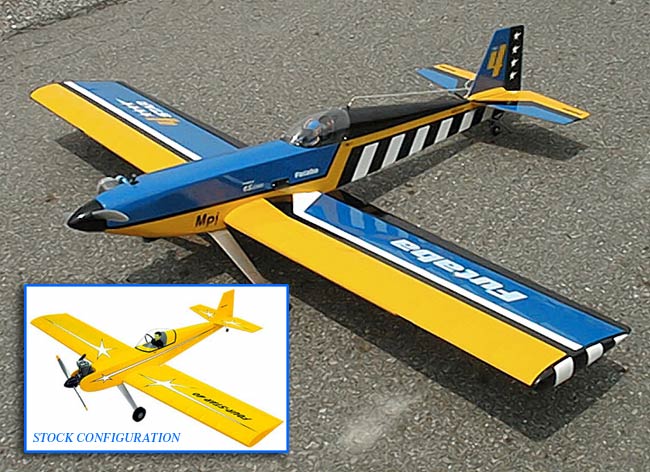
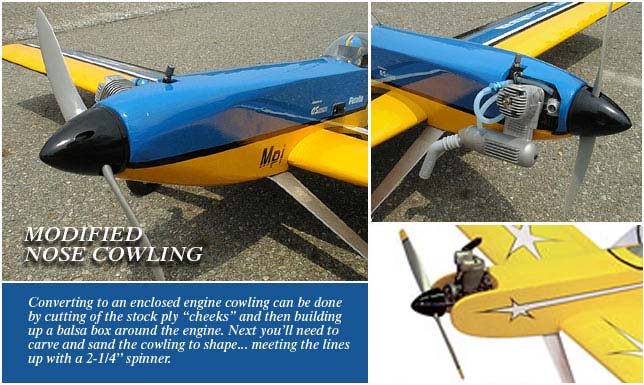
Well, the 4-Star is not a bad looking plane out of the box... certainly much better than some but it won't win any beauty contests. The twin-cheeked, open faced trainer nose and the goofy looking canopy just rubbed me the wrong way. So, in addition to extensive graphics application, I went ahead and changed out the nose and cockpit, as well as quite a few other more minor alterations. Check this pic out for the "before & after" comparison between a stock 4* and my little sweetie.
Ya Gotta Love them Laser-Cut Sticks!
As for the kit itself, it was very well done. Virtually all the parts were Laser-Cut interlocking pieces with the only exception being the spar webbing panels. Everything fit very well and came out straight and plumb without having to wear out a sanding block. The instructions were very well done and the plans were excellent.
As for structural support/enhancements, I added some wedges in the corners of the tail feathers, added the optional triangle-stock supports around the base of the vertical stab, threw in a little extra balsa behind the main gear base plate, and of course, modified the nose & turtledeck.
I used all the supplied components except for the tailgear, the 2" spinner and the decals. I heard a lot of complaining about the weak stock tailwheel assembly that mounts into the rudder, so I upgraded here to a different setup. I used a little heavier tail gear assembly that actually mounts to the fuselage and has spring-loaded linkages that hook up to the rudder. This lets the rudder steer the tailwheel without putting any load directly on the rudder or rudder servo. The spinner change was due to the cowl modification, and the decals... well let's just be nice and say I chose something a little less 70's for graphics.
Giving your plane a nose job
Now on to that beautiful shnoz...
A great friend of mine from the club let me borrow an old RC magazine that had an article on building a balsa engine cowl for 4-Stars and Tigers. So, off came the cheeks and out came the balsa stock. I'll have to say that this was actually the funnest part of building the plane.
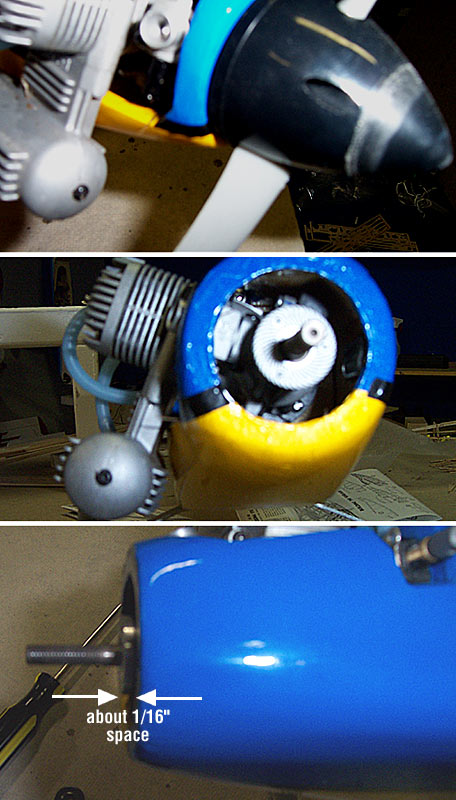
The process was actually quite simple. Just build the fuse up the way you normally would, but you cut the two ply cheeks off right at the firewall. Temporarily mount your engine at about a 9 to 10-o'clock position, and then start building a "box" out of balsa that goes around the engine and slopes inward to meet a 2-1/4" spinner. You'll actually have a 2-1/4" ply "ring" mounted to the back of your spinner (spaced about 1/16" back from it) and you'll build the balsa out to meet it. This makes it so your new nose is perfectly aligned to, and spaced away from your spinner when you get done. You'll have to build the "engine side" last and build an opening around the rotated engine hardware that sticks out of the cowl side. Now you take your spinner back off, pull the engine and start carving. (FYI: I filled the nose of this baby with an OS 40 LA with a 10 x 6 prop and 8oz. tank.)
The article tells you to use a balsa plane, but I just used a regular #11 Xacto knife to star cutting the four fuse corners down at 45 degree angles on the new nose. You repeatedly cut these new angles down further until it starts getting "conical" in shape and slopes to follow the lines of your spinner. When you get close, whip out the coarse sanding block and start sanding it to a smoother shape.
Occasionally remount the engine & muffler to make sure you are clearing all balsa as needed, can still get to any screws you'll need to reach, and be sure the balsa has some clearance to the cylinder head & muffler. All the other steps are performed as usual such as sealing the inside of the cowl, running & testing your fuel lines & throttle linkage, etc..
This is by far not a tutorial on how to build this feature, but it gives you a general idea on what you have to do to give your plane a beautiful nose job.
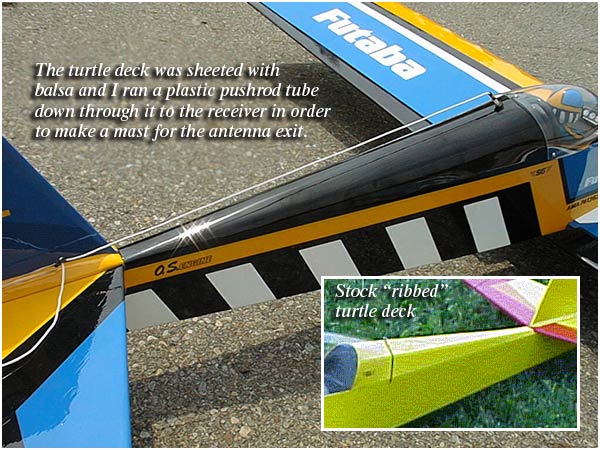
I read of some opinions that the ribbed turtledeck was a weak point, and I wasn't to crazy about how it looked, so I decided to go ahead and sheet it with 1/16" balsa. I won't go into how I did this since it's just your standard sheeting procedures. I will however mention that it made it look much better and facilitated other modifications that I made later on.
I wanted to find a good way of running the antenna without running it inside the fuse, and I wanted to be able to pull it and rerun it if needed later. So, I came up with an antenna mast approach that is actually a plastic pushrod tube that runs through the turtledeck down into the radio compartment. This allows me to run my antenna up through the mast and back to the tail (rubber band anchored for flexibility) and maintain the ability to easily pull and re-fish it later if needed.
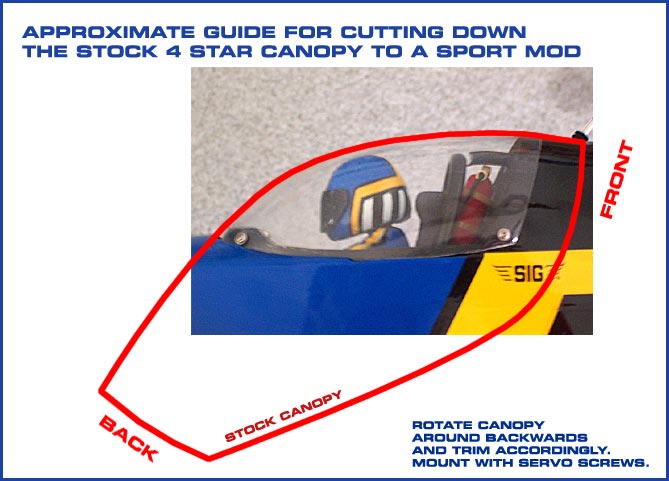
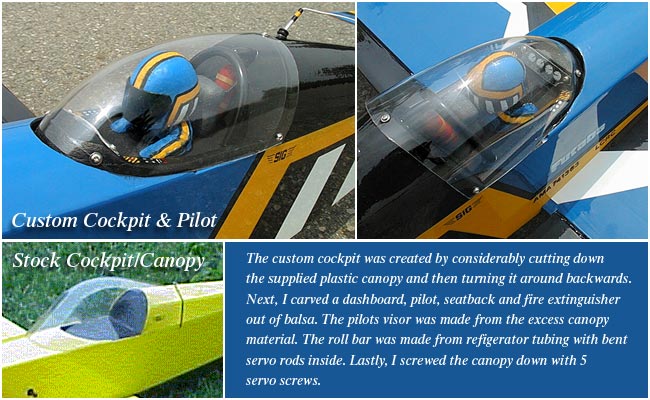
Well I'm sorry but I just don't like that huge bubbletop that the kit comes with. It's too dorky and obtrusive to follow the rest of the lines of the plane. My remedy was to cut it down to just the top rear 1/3 of the canopy and turn it around backwards. This made the canopy much smaller as well as slope down to meet the top deck instead of bubble up over it.
Also, I built a detailed balsa dash inside the cockpit that allowed me to wedge the front of the canopy down between it and the "hood" of the top deck. I let the sides go flush to the cockpit floor and ran the back end of the canopy up onto the turtledeck about a half an inch. This all allowed me to fasten the canopy down with 5 servo screws instead of glue it down, and it let's the cockpit "breathe" eliminating the dreaded canopy fog I see in most cockpits.
Next I built a custom pilot with a helmet/visor trimmed out to match the plane. I know, it's more of a racing look, but he needs a helmet the way I land.
Lastly, I added some more gratuitous detail such as a seat back, roll bar and fire extinguisher. It all comes together to give the cockpit a more believable feel than the standard "flat-bottom aquarium with a manikin stuck in it" look.
NEW Trim-Guide Pic added!
Customize with Covering and Graphics
Well the sticks are all glued and now ya gotta put some skin on 'em. While many builders just want to get it covered and in the air, I like to spend a little more time on this step... This is half of the building experience for me. If you want to complete your planes character, you gotta give it some sharp threads.
After an hour of standing in front of a wall of Monokote rolls Don's Hobbies in Newark, I finally made up my mind on color... all four of 'em. I went with Dark Blue and Cub Yellow for my main colors and used Black and White as my accent colors. This was all after spending a few days on my computer trying out tons of "virtual covering schemes" in Adobe Photoshop. I can't recommend this step highly enough. The computer is an invaluable tool in designing your covering schemes. You just start with a digital image of anyone's covered plane, then "paint in" your own ideas, saving multiple versions along the way. Programs like Photoshop really make it easy to have multiple layers of covering that you can swap colors with or turn off and on as needed. Also, you can make custom graphics that you print out on a Laser/Ink-Jet printer to use as templates for cutting Monokote.
One of my main goals in covering this bird was to make the top and bottom distinctly different. Us old folks have a rough time telling which side is up when the plane gets way up and out there, so I need all the visual cues and clues I can get. So, with the darker blue & black making up most of her topside, I went with solid yellow on the entire belly. I also threw in some stark black & white stripes on the wing tips angling in about 6 to 8 inches on the wing underside. This makes it much easier to check your level when your coming in for a landing. For a little added accent, I made all the control surfaces black - top and bottom side, except for the topside of the elevators.
As I said, my choice was Monokote, although you could use any of the other high-strength film-based coverings. Just don't use any of the flimsy/stretchy stuff 'cause the covering is half of the strength of your wing.
I put the main colors and trim scheme down on the wing and fuse in the normal fashion with a sealing iron and heat gun. Just make sure you put your seams on areas with solid ply or balsa behind them (to iron to). The overlapping trim accents can be done a little differently though, especially since they cross webbed/stretched areas without wood behind them.
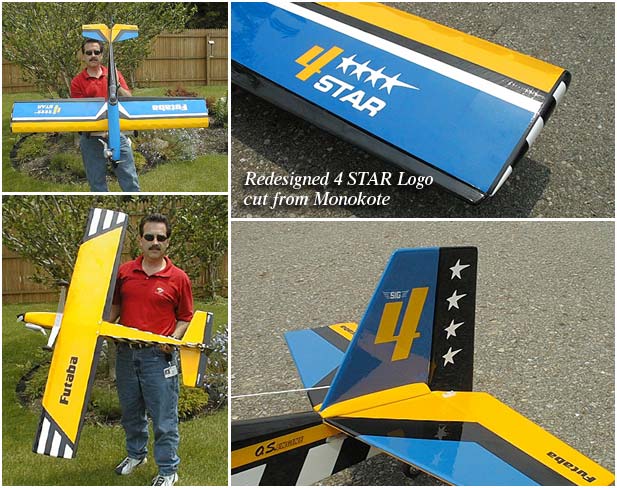
For these areas I designed new graphics (such as my version of the 4-Star logo) and hand-cut them out of Monokote. Next I applied them to the base covering by using Monokote Trim Solvent. That stuff's great... just moisten the surface of the base covering then lay your graphics down and squeegee them out. Be warned though, air bubbles can run rampant if you're not careful and the Monokote locks down almost instantly when you apply it to the solvent laden surfaces.
I used this technique for most of the graphics, like the logo, stars, pinstriping and the black & white stripe patterns on the rear fuse & wing tips. I confess though that I used decals for the Futaba, OS, MPI and SIG logos.
