Scale Access Hatches & Details
 Catapult Hooks Catapult Hooks
This is where you go cross-eyed trying to measure and position the bajillion rivet lines and hatches on the SBD. You have to start out by marking all your rivet lines from your 3-views/documentation so you'll know where the various hatches go on the wing. In the case of the SBD, we're talking about no less than 90 various hatches on the wing alone!
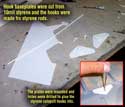 I started out by building the plates that served as hooks for the carrier's catapult bridle. Though virtually never used, they still were a scale item that needed to be replicated. I started out by building the plates that served as hooks for the carrier's catapult bridle. Though virtually never used, they still were a scale item that needed to be replicated.
These, like all the other hatches, were made from the good ol' Plastistruct 10mil styrene, and glued on with medium CA. On these specific plates, I made the hooks out of styrene rods, heated and bent them, then glued them into small holes drilled in the wing. I went ahead and added the rivets on this plate too.
|
|
|
 |
Hatches Galore
I then proceeded to cut the rest of the hatches and glue them into place. About 90% of these hatches went on the bottom of the wing, so most of my time was spent there. There are a number of various shapes and sizes to these hatches. Some are hinged, and some are not. So, I found it easiest to pick one of the shapes/sizes and cut the first hatch from styrene as a "template" for all the others. I then cut all the rest of the hatches for that particular shape/size, glued them onto the wing, and then moved on to the next shape/size hatch.
|
 I also made sure to scuff both sides of each piece of styrene with a sanding sponge before cutting them out. This would help the CA to stick to the styrene and also help the glue rivets and paint to stick the hatches when I get to that step. I also made sure to scuff both sides of each piece of styrene with a sanding sponge before cutting them out. This would help the CA to stick to the styrene and also help the glue rivets and paint to stick the hatches when I get to that step.
I also lightly sanded all the edges to get rid of any roughness, and eliminate sharp corners and edges that would easily get snagged by a rag in the future.
On the hatches that had hinges, I used styrene "half-round rod" to make the hinges, and even added little finger tabs for opening. With a little patience and a couple days work, I had all the hatches on both sides of the wing complete.
|
Ready for Rivets!
Here are a few parting shots of the 90+ access hatches and a few other scale details on the wing. At this point, I'm pretty much done with the wing and ready for riveting (except for the control surfaces). Before I rivet, I'll go ahead and do all the scale surface details for the fuse too, then rivet them both at the same time. Stay tuned!

"Steps 'n' Scoops"
|