|
Feb 21, 2006
Optional Cockpit Modification
 This is a totally optional modification that I chose to make... just personal preference. The stock design configuration for the JDM kits is as shown at right. The standard "false floor" and pilot bust are intended here, in which case you would just sheet the cockpit deck from front to rear just as you would any other portion of the plane. You may opt to use something like 1/32" aircraft ply if you want something a little harder and stronger to attach a pilot bust to, but it's probably not necessary. This is a totally optional modification that I chose to make... just personal preference. The stock design configuration for the JDM kits is as shown at right. The standard "false floor" and pilot bust are intended here, in which case you would just sheet the cockpit deck from front to rear just as you would any other portion of the plane. You may opt to use something like 1/32" aircraft ply if you want something a little harder and stronger to attach a pilot bust to, but it's probably not necessary.
As for me, I chose to cut this entire area out to allow for a deeper cockpit area. The nature of the foam fuse dictates that there really isn't a lot of room inside for a truely scale accurate cockpit, or for a lot of radio gear inside if you did a full depth cockpit floor. Therefore, I'll be going for a 1/2 depth cockpit and dimensions will be off-scale as required by the foam wall thickness and overall design. I'm really going for something that looks really nice, realistic and complete from most viewing angles. You'd have to get right up on top of the canopy to see that it's not full depth. This will leave me a little extra room inside the fuse for my mechanical and radio gear.


 |
To begin, I cut out the horizontal, flat cockpit deck, which is basically a rectangle. I cut it to about 1/4" from the outside edge of the fuse. Once that is cut out, you can really see what you have to work with, and the depth/thickness of different areas involved for making good decisions on what to cut and how deep.
I then began removing more foam at the front end of the cockpit, which would later allow me to rebuild this area back up in balsa to form a more scale instrument panel area. As for the rear end of the cockpit, I hollowed it out such that you wouldn't see the flat angular solid surface that the the stock design displays. Rather, you would see a curved recession back into the turtle deck area, which would mostly be visible only when looking right down into the canopy from overhead.
Lastly, I proceeded to cut the overall opening larger, little by little making the walls thinner at the very top until they were flush and level with the stock wall cutout that extends throughout the entire fuselage tunnel. This puts you at about 3/16" thick at the top siderails but quickly tapers out to the inch or more thickness of the rest of the fuse body walls. |
Preparing Templates and Sheeting
 Now to prepare for sheeting the fuse interior tunnel, I first cut templates from heavy construction paper. This is easy as you can slide pieces inside, make a few rough marks, trim and repeat the process until your template fits like a glove. The really nice thing is that one sidewall template works for both sides (exactly the same). Also, if you do the stock cockpit (rather than the mod that I am doing) the same would be true for the top/bottom template... one template for both. Now to prepare for sheeting the fuse interior tunnel, I first cut templates from heavy construction paper. This is easy as you can slide pieces inside, make a few rough marks, trim and repeat the process until your template fits like a glove. The really nice thing is that one sidewall template works for both sides (exactly the same). Also, if you do the stock cockpit (rather than the mod that I am doing) the same would be true for the top/bottom template... one template for both.
With all your template pieces cut, you can go ahead and lay up a couple pieces of balsa from two balsa sheets each. Use whatever glue and technique you prefer, everyone has a preference on this. Mine is fast and simple (for me). I just lay out a sheet of wax paper, true up the edges of a couple sheets (or find two that match perfect) and butt them tightly together on top of the wax paper. Working from left to right, I use thin CA down the seam, holding everything tightly together as I go. The thin CA saturates into the balsa, sets up very quickly and gives me a good strong, clean bond. As soon as it dries, I go over it with a 100 grit sanding block to lightly knock off any excess CA. Quick hit with a fine sanding block and you're good to go. I've never had any problem with sheeting joints of this type, no seams, no hassles and you're done in minutes.
Lastly, lay your templates out on the two pieces of sheeting you glued up and trace them out. Then all you have to do is get your Xacto knife out and cut the pieces out. That's it, you're ready to sheet.
|


|
Applying the Foam Bond Glue
Using a 3" paint roller, go ahead and spread out the Foam Bond glue on one of the inner side walls, being careful to make sure you get it all the way up into the corners where it meets the top & bottom walls. You're going to want to let it dry a while before putting glue on the balsa sheeting, as it will dry very fast on the wood. While the glue is setting up on the foam, you can keep your roller and glue pan wet by covering them with a piece of Saran wrap. This will keep it wet and workable for a very long time and saves on glue and washups.
   
 Here's a tool tip that may help you out. For my 3" glue roller, I prefer to use velour rollers with a very low/short nap. These don't shed and it takes very little glue to saturate the cover to the point that it will start evenly spreading glue. Thicker covers take a lot of glue to saturate and that's usually glue that you'll never get back... waste. Here's a tool tip that may help you out. For my 3" glue roller, I prefer to use velour rollers with a very low/short nap. These don't shed and it takes very little glue to saturate the cover to the point that it will start evenly spreading glue. Thicker covers take a lot of glue to saturate and that's usually glue that you'll never get back... waste. |
Once the glue on the foam is relatively dry to the touch, but maybe slightly tacky, go ahead and roll out some glue on the back side of your sidewall balsa sheet. The balsa sheet will quickly start warping from the moisture in the glue, but you can reverse this by spraying some ammonia/water mixture on the back side of the sheeting. Once they are both equally dry, but not cured to a hard surface, you can apply the sheeting to the inside wall of the fuselage.


 |
Applying the Sheeting
Applying the sheeting is a very straightforward process as you would imagine. Just place each sheet inside, mating the Foam Bond glue surfaces together. I find that keeping a clean 3" roller on hand is helpful here. You can use it to roll over the sheeting, pressing everything down very tight/smooth and work out any trapped air that may be under the sheeting.
You can also use a few pieces of tape and some building pins to hold everything in place while the glue sets up. Check it every so often to make sure everything is laying down smooth and not lifting up. I'd let it set up for another 20 minutes and then start on the opposite wall. Then the top, and lastly the bottom. When doing the top and bottom, you may have to sand the edges of the sheeting back a bit as the thickness of the two side wall sheets has now made your templates a little oversized.
 Add balsa to the remaining interior areas like the small strips at the leading and trailing edges of the wing pocket. I used 1/8" balsa here to give the thin styrofoam a little extra strength. The next day everything will be cured up and you can trim & sand back any excess sheeting flush with the outer surface of the foam fuselage. Add balsa to the remaining interior areas like the small strips at the leading and trailing edges of the wing pocket. I used 1/8" balsa here to give the thin styrofoam a little extra strength. The next day everything will be cured up and you can trim & sand back any excess sheeting flush with the outer surface of the foam fuselage.
|


|
Finishing Up
 Back to my optional mod, I went ahead and began adding cap strips around the perimiter of the cockpit, which I will sheet up and over when I sheet the outside. I also began building up the foundation of the instrument panel area from some scrap balsa. This will give me some good hard balsa to begin gluing more finished structures to later and ultimately, the actual instrument panels themselves. Back to my optional mod, I went ahead and began adding cap strips around the perimiter of the cockpit, which I will sheet up and over when I sheet the outside. I also began building up the foundation of the instrument panel area from some scrap balsa. This will give me some good hard balsa to begin gluing more finished structures to later and ultimately, the actual instrument panels themselves.
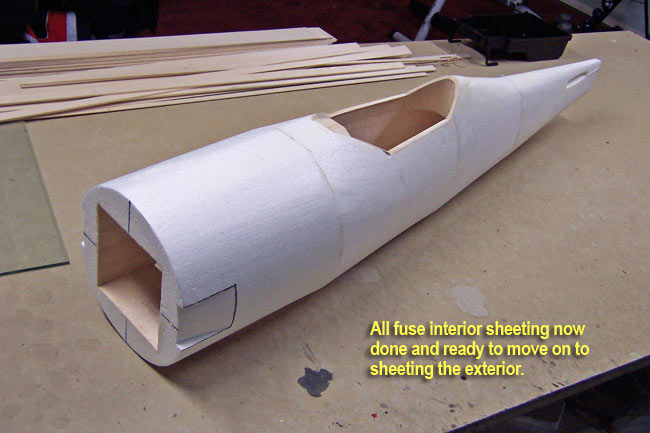
That's it, the fuse is all sheeted up inside and ready for exterior sheeting. But, first we'll add the F-2 plug, do a little tri-stock inside and take a look at an optional mod. |
|
|