|


|
Prepping the wing for sheeting
OK, before we actually start sheeting, I have a few more steps I need to take to get everything ready "inside" the wing. To start, I decided to go ahead and cut out the foam in the wheel well all the way through the top side of the wing since I was nearly there already. This would give me a cleaner bottom to the well after sheeting.
Next, I ran some dental floss between each servo bay and on out the root end of the wing, taping it off at each point. This would be to attach my servo leads to much later and help me to fish them through the channels into the bays.
Next, I figured out the rough area that would make up my access hatch to install the retract base to. I then masked off this area so that no FoamBond glue would go down on the wood, allowing me to easily remove the sheeting to lay in a hatch later.
Lastly, I took some posterboard, laid it out on the wing trimming it to the outline of the wing and taping it down. I then cut out the areas for the servo bays and current retract cutouts (which will be expanded later).
I also sketched out all the critical internal components so that I could easily figure out where everything was inside the wing after the wing was sheeted and nothing could be seen in there anymore.
With all these steps complete, I'm ready now to begin laying up the "skins" for the top and bottom of the wing. |
Preparing the skins
This is pretty straightforward, using the same basic steps as done when sheeting the fuselage. First you need to get all your sheeting edges square and true, which I had already done to all my planks back when I sheeted the fuselage. Then, go ahead and lay up enough planks to cover the top and bottom of each wing, making four skins. Use the glue and technique of your preference, I prefer to lay everything out on wax paper and glue the edges together with thin CA. This has always worked great for me and the skins are ready to sand as soon as you are done with the last plank.
Next, lay your wing out on each skin and sketch a rough outline and/or pen some registration guide marks on the foam and balsa to aid you in alignment when gluing them together.
|


|
 |
I chose to get the styrofoam wing chucks that the cores came in back out and glue and tape the inboard and outboard chucks back together. This gave me a complete top and bottom chuck for each wing to "cradle" into when the glue was drying. |
|
Sheeting the top side first
Start by sheeting the top side of each wing first. I sheeted left top, then left bottom, then right top and lastly, right bottom. That allowed me just the right amount of working time between gluing up each skin, and kept things moving quickly. I spent about 3 total hours to do all the sheeting for both wings.
First step on the top of your first wing is to roll out your FoamBond glue on the entire top surface of the styrofoam wing core. I do this by applying two light coats, and speeding up the drying between coats by hitting it with some low heat from a heat gun. This gives me a good even coat of glue with no unknown "dry spots" that might not adhere well to the skins.
IMPORTANT TECHNIQUE TIP |
| If you want to make the flap pockets a much easier task, you might want to try this technique. Instead of gluing your sheeting to the flap pocket foam and removing it later with a hot wire, I did it a little differently. I simply avoided getting any FoamBond glue on the pocket area of the foam and the sheeting so it wouldn't take hold there. Be sure to glue out 1/4" or so past the flap spar into this area, as well as around the two ends and trailing edge. Just be sure to leave the majority of the center area of the flap free of glue. The foam will come out fast and easy later if you try this. |
About 15 minutes or so after gluing the foam, apply the FoamBond to the backside of the top skin... again, using two light coats. Like on the fuse, you'll find the sheeting will want to warp up a lot as the moisture from the glue soaks into the balsa. No problem, just flip it over and spray the top side with some of your ammonia/water mixture... it will relax out nice and flat.
Once the glue is relatively dry to the touch on both pieces, you can lay out your sheeting, glue side up and line up your wing over it. If you don't have someone to help you, here's a technique I use to keep you from letting them touch before they are perfectly lined up...
Just hold the wingtip up 6" or so off the sheeting and lower the root end down onto the guide marks. Lay a long stick of balsa across the wing skin, spanning from LE to TE. Now slowly lower the wingtip down onto the stick, adjusting as needed to align to the guides at that end. Once it's lined up, pull the stick and let it settle down onto the sheeting.
Now, press the wing down onto the sheeting from root to tip, pushing around what would be the CG/spar area of the wing. Roll it forward onto the sheeting all the way to the leading edge. Then, roll it backwards onto the sheeting all the way to the trailing edge.
Flip it over and roll the sheeting out on the whole wing with a clean/dry roller. Make sure you press everything down good around the edges. I also "rough trimmed" the balsa sheeting back to within 1/8" of the wing edge at this time so I wouldn't catch it and crack the skins.
|


|


|
Sheeting the bottom
Next, I cradled the wing into the top wing chuck, with the bottom side of the wing facing up. I applied the FoamBond glue to the core and sheeting using the same method as done above on the wing top.
Before applying the sheeting, I removed the masking tape from the retract hatch area. The sheeting glue won't take hold here now since there won't be a mating glue surface for it to contact with.
Now pull the wing out of the chuck, lay your sheeting out and apply the wing core to the sheeting using the same method as with the top side. If you want, you can now tip the wing up to get the sheeting to go flat on the undercut area of the wingtip (washout area). I had better luck just flipping it over and rolling it out with a dry roller like on the top side, then worked my way out to the tip, rolling out the washout area a little at a time (wet it down more if needed). When doing this, make sure you have the wing laying back in the top wing chuck so you don't distort the wing shape. Once it's grabbed hold, you can pull it back off the chuck and continue to roll it out more, working diligently to get the very tip and edges to secure.
Lastly, I sandwiched the wing back between the two wing chucks, with the bottom side facing up. I laid a long plywood board across the top with some weights added to the board. This will really press the wing down into the shape of the cores and keep the pressure distributed evenly.
If you follow these steps, you should have no problem getting a solid and very straight wing. I let mine set for 24 hours before messing with it any. The moisture in the glue will evaporate out of the balsa as quickly when trapped between the foam chucks, so you need that extra time to let it cure up. Actually, it still needed a few more hours of drying after I took the wing out of the chucks. |
|
Sheet the ailerons
The ailerons are sheeted using the exact same steps as done when sheeting the elevators earlier, so I won't go into detail here. Get them both sheeted, lay one on top of the other, add a board and some weight... overnight dry... your done!
|

|


|
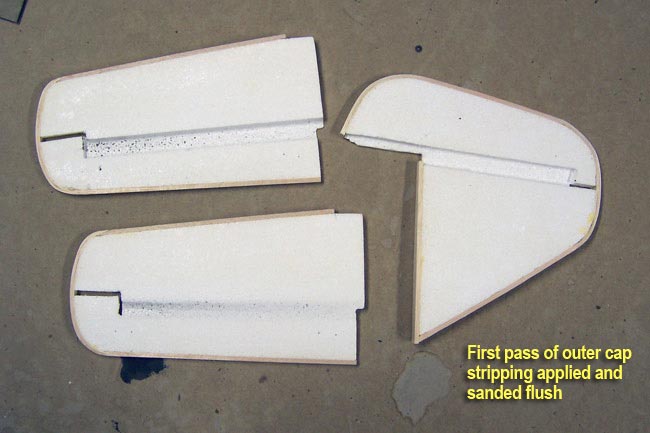
Sanding and servo bays
Once the glue is fully cured, you can trim and sand all the excess sheeting around the edges of the wing, sanding the sheeting flush with the edges of the cap strips.
As you can see in the pics at the left here, the thin trailing edges are now 1/8" thicker from the sheeting and came out quite straight.
The next step was to open up the servo bays. By laying out my posterboard template on the wing bottoms, I was able to trace out the areas that needed cut out. Open up a smaller hole at first, then gradually enlarge to the very edges of the bays.
The pic at left shows how my 1/8" servo plates recess 1/16" down into the bays making them flush with the top of the 1/16" balsa skins now.
I won't cut out the area for the retracts yet, as I may still need that area intact to make my gear doors later. |
|
The flap pocket
The FW190 has "split flaps" which means the flap surface drops from the bottom of the wing, leaving the top surface of the wing flap area unchanged. This creates a hollow "pocket" in the wing just above the flap. The wing foam is still intact here though as we sheeted right over this area.
If you remember from my "Technique Tip" above, we didn't FoamBond the sheeting down to the styrofoam in the flap pocket area. So after using my template to sketch out the pocket area on the wing skins now, I cut out the bottom balsa sheeting and it lifts right off of the foam core... presto, clean as a whistle!
It will want to bite just a little around the edges since you apply the glue 1/4" out into this area, but just a little persuasion and prying will convince it to let go. The edges all the way around the pocket maintained a good hold and were unaffected.
Removing the foam from the pocket was just as easy. It broke out of the pocket in large chunks leaving a clean surface in the bottom of the pocket (backside of the top sheeting). This area is now pretty fragile without the foam so I laminated the backside of the sheeting with 1/32" aircraft ply to stiffen it up. I also added some balsa tri-stock down the joint where the flap spar meets the aircraft ply laminate.
You now have a clean, and relatively sturdy flap pocket. Make sure you leave the 3/16" built up cap stripping intact at the trailing edge of the pocket so you have a complete 4-sided "box".
|


|

|
Sheeting complete
Well that covers the sheeting and cutting out of the flap pocket. I have more work to do in the flap pocket area later, but we have to get the second round of cap stripping done ont the wing first! |
|
|

"wing capping round two"
|
|


