 |
 |
Covering and Graphics
Materials used:
TopFlite Monokote Covering
- Royal Blue
- Sky Blue
- Blue Mist
- White
- Black
TopFlite Monokote Trim Sheets
- Sky Blue
- Blue Mist
TopFlite Monokote Trim Solvent
As a professional graphic designer by trade, each time I cover a plane I look at it as a blank canvas ready to be painted. While many dread the covering process, I probably enjoy this part of building the most. I have many ideas for covering schemes and not nearly enough planes to try them all out on!
Monokote vs Ultracote
Now here's a controversial topic that can stir up a hornet's nest. You'll often find that most guys fall into one or the other of these two camps and swear by them. To be perfectly honest, to date I really haven't dabbled in Ultracote other than UC clear for sealing control surface hinging. I've got a good stable of Monokote products building up and it's hard to make the switch with so many partial rolls, trim solvents, trim sheets, etc. laying around that I can't mix with a UC covering job.
From what I've gathered at the field, Monokote requires much higher heat than Ultracote to apply, but isn't quite as durable. I'm a little more impressed by the Monokote line of colors, paints and accessories, but what little Ultracote I've used definitely went on a little easier. Suffice it to say, that either covering is a top notch product and is much better than some of the "shelf paper" wannabe's out their. On a side note, when covering smaller e-fliers, I really like Nelson Light Film.
Adobe Photoshop and a Macintosh... Two great tools for the RC plane builder
The easiest way to come up with a nice color combination and trim scheme is to get some good pics of an existing plane and "paint over" the pics in a good image editing package. I use industry standard pro tools like the Macintosh G4 and Adobe Illustrator & Photoshop to put together my designs.
After determining my covering type & colors to use, I take a good top view and quarter/side view into Photoshop. If I can get my hands on the rare "bottom view" too, all the better. If not you can use the top view and ad-lib a little. I'll then cut the plane out of the background and move it up to it's own layer in the document. I can then cut the wings, tailfeathers, canopy, gear, etc. out into their own respective layers as well. This makes it very easy for me to "paint" over each component individually and make color changes quickly to a single item
It's usually best to start with your top design, then the bottom, and then extrapolate them into your side view. Keep in mind that the most important thing in designing your trim scheme is to have good contrast between the top and bottom of the plane. Or, use high contrast, large graphic shapes that will quickly differentiate the top from the bottom. Remember, at long distances such as normal flying heights/ranges, the eye basically sees in grayscale, not color. So, blue on white looks like black on white at a distance (good), while blue on red can look like black on black (not so good)! Which side (top vs btm) should be dark vs light is really a matter of personal preference
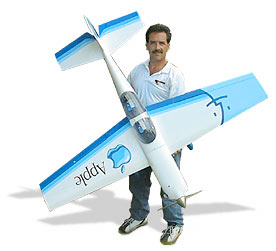
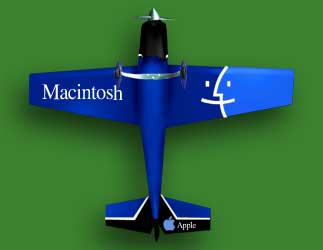
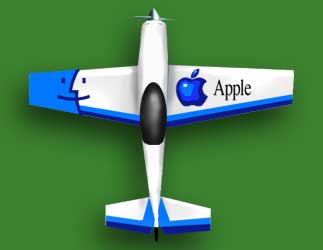
Here are a few images that I went through coming up with my Mac Daddy trim scheme. Thanks to fellow LCRC member Bill Riley's Extra 300 photos, I was able to paint a variety of schemes out over his plane to come up with mine. As you might notice, the final plane varied slightly from the original plans shown here due to some last minute changes (click pics to enlarge).
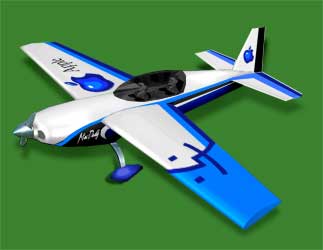
With the trim scheme designed I verify it to the finished model "in the bones" to look for any structural issues that may cause covering obstacles and revise as needed. Sometimes I need to slightly alter my design, and sometimes I need to modify the plane itself to hit my target. In the case of my Mac Daddy, I did both.
Now that final changes are made, I give it a good last sanding and start laying down the base colors, usually starting with the wing, and always working from the bottom side of the plane up to the top. I generally limit my ironing to a outer edges & seams rather than ironing everything to all sheeted surfaces. It gives a much smoother finish after hitting it with the heat gun but admittedly it probably doesn't support the plane in strength quite as much. Once all the base colors are down, I go back and start on striping, graphics, etc.
Special Graphics & Logos
Coming up with special graphics, logos, etc. are a little easier for me since that's what I do for a living, but you would be surprised what you can do if you take a little time to try this and have the right tools to do it with. To come up with the Apple & Mac logos/art I used Adobe Illustrator and hand drew them with the bezier pen tool. Using colors I mixed to be close to my Monokote colors, I created the vectored art and moved it over to my Photoshop document to try them out for size on my guinea pig plane. Once final art has been nailed down, I go ahead and print the art out on a laser printer at actual size. Now comes the fun part...
While it probably makes more sense to take my art to a sign shop and have them cut it in vinyl, I choose to hand cut mine from Monokote, allowing me to match my plane & trim colors exactly. Basically, I tape the Monokote down to my printouts and cut through the printed art into the MK film with a #11 Exacto blade. I know, tedious work but I'm a little goofy that way.
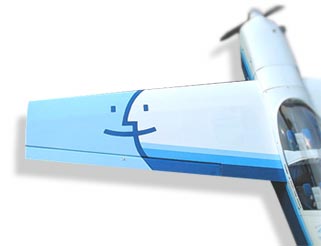
In the case of the "smiley face" Macintosh logo that appears on the top and bottom of my wings, I actually sheeted in one of the open bays on both the top and bottom of one wing side to facilitate ironing a seam. This way I was able to cover the top and bottom of the wings with White and Royal Blue respectively and cut a contoured seam across the sheeted bays, overlapping these colors with the Blue Mist and Sky Blue colors used in the Mac "face" logo.
This was preferrable to fully covering the top & bottom then doubling up the covering by adding the face colors over top of the base colors. The thick lines that make up the face were hand cut and laid right over the shaped seams.
The stabs were covered with White, and then I cut the swoosh stripes out of the Blues, applying them over top of the White with Monokote Trim Solvent and an iron. The Rudder was done the same way, while the Elevator was covered completely with the darker Royal Blue.
I painted the cowl & wheel pants with LustreKote White Primer, then LustreKote White & Royal Blue, and finally added a couple coats of LustreKote Crystal Clear. After shooting the primer, and mounting the motor & cowl, I drew my striping lines onto the cowl to get proper line-up. I then took the cowl off and painted the top half with the LK White and the bottom half with the LK Royal Blue. I put the seam right in the center of the stripes so that the lighter Blue Mist stripe goes over the White while the darker Sky Blue goes over the Royal Blue. These stripes were applied using Monokote adhesive backed Trim Sheets... much easier than trying to iron them on out of conventional Monokote, and you can't use Trim Solvent here, it eats the paint. The key to getting these stripes to wrap around the belly of the nose and line up is to wrap a piece of paper or clear film around the nose first, taping it in place with Scotch tape. You then draw the stripes onto the paper, cut them out, and use them as a template to cut out the actual stripes from the MK Trim Sheets. This makes them bend and curve the proper amounts as they follow the contour of the nose when applying.
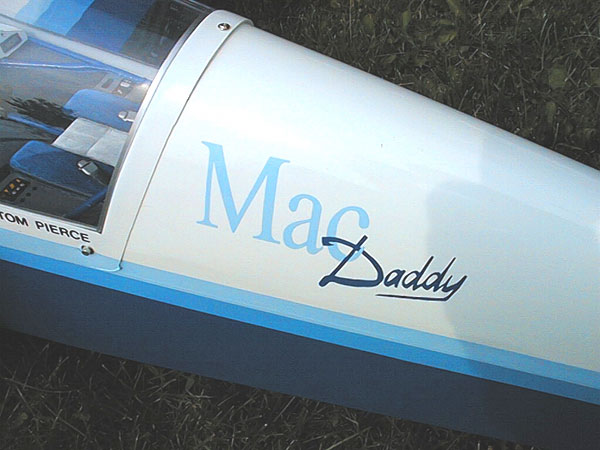
One little trick I learned near the end of the covering job was utilized for the "Mac Daddy" monogram on the turtle-deck. Rather than trying to iron or Trim Solvent the lettering on, I cut them out as usual, then wet down the fuse with mildly soapy water. Apply the MK letters onto the fuse, slipping and sliding them around into proper position. Now you let the water dry (best over night if you have the patience) and they stick OK. Next I put the iron on a low setting and very carefully work the letters to seal them down better without bubbles/wrinkles. I then used a Q-Tip to go around the edges of all the letters applying a very light application of MK Trim Solvent to the really lock down the very edges of the letters.